Who wants to wait (or pay highly inflated prices for pre-production run) for the Raspberry Pi Model A, when you can have it now for a low price of $36AUD complete with a 512 MB RAM update?
Cosmetically and functionally the Model A has removed the LAN9512 IC, Ethernet port and the secondary USB port. Under the hood, they have also designed the PCB to accommodate both Model A and B configurations, depending on the placement of a couple of components. In this series, I will be converting the Raspberry Pi Model B to a Model A with 512MB RAM.
Let's first compare the two boards by eye. On this page they have nice pictures of the Model A board. Looking at these pictures and our current board, we essentially want to remove the extra components from the Model B to match the Model A.
Firstly, we want to desolder the LAN9512 chip:
By holding a gas/butane torch a couple of centimeters from the board with a hot blower attachment, heat the surrounds of the chip gently to raise the latent temperature of the board. After about 30 seconds, move the heat to the center of the chip and circle about the edges slightly, you should very shortly be able to lift the chip up with tweezers and remove the IC when the solder starts to re-flow (if you have trouble with tweezers, you might be able to just slide it sideways with a small screwdriver until it comes loose). The chip should just come right off (I recommend that if you have never done this before, to practice on some dummy PCBs that you have handy). As an aside, one of the neat things about using a butane torch for re-flow use is that it doesn't blow small components around as much and it also burns most of the oxygen from the heat it provides. Oxidization is a killer for re-flow tasks.
Let's now test to make sure things still start up:
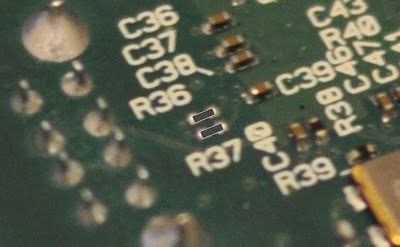
Ahh, activity lights of joy. But there is now no functional USB. Comparing the two boards I notice the Model A is missing most of the SMD mount components around the LAN9512 chip, except for two new resistors (R36 and R37) that don't exist on the Model B.
Model A:
Model B:
According to the schematic, R36 and R37 are just Zero-ohm links which connect the USB port directly to the Broadcom BCM2835 when the LAN9512 isn't populated. We can just bridge these like so:
Once you have done this, you can then fire up your Pi:
Plug in a USB device and test it out (note, only the bottom port works now):
Success! A Das Keyboard on a USB hub.
Functionally we now have a Raspberry Pi Model A, but cosmetically things aren't quite right yet. In part 2 I will be cleaning up the redundant SMD components from the board and changing the USB connector.
Thursday, January 24, 2013
Subscribe to:
Post Comments (Atom)


Where can I get one of those microSD adapters?
ReplyDeleteI got mine off ebay:
ReplyDeletehttp://www.ebay.com.au/itm/SD-to-Micro-SD-Card-Adapter-for-Raspberry-Pi-/281027959998?pt=LH_DefaultDomain_15&hash=item416e925cbe
awesome, saved a broken raspberry thanks to you ;)
ReplyDeleteOh awesome, what was wrong with it?
DeleteThank you for posting this! I needed a 512MB Model A, and your instructions were perfect. I ended up buying a BernzOmatic 6-in-1 Solder and Repair Micro Kit Handheld Torch for $20 from Lowes or Home Depot. Thanks!
ReplyDelete